Friday, November 11, 2016

Gorilla Poops aka Uncooked Cookies

This is a family favorite for about everyone for me. In fact it's been used every year for a birthday cake for Mendis and at least one of the boys too had it too.
 Here is my original recipe straight from Grandma Cooper. There are just a few adjustments. 
I use regular oats not the instant. I always have so if you like Grandma's use the instant oats and if you prefer mine use the regular old fashioned oats.
Make sure you use a decent size heavy pot to start because you will be adding all the ingredients to it.
So put the top portion of the ingredients in and stir frequently until it comes to a rolling boil. While it is warming up I pre-measure out the last section of the ingredients. 

 So here's my little food tip. (Just like Food Network) I put the 1/2 cup chopped nuts in the bottom half of the measuring cup and then add a heaping 1/2 cup of peanut butter right on top. I do this because I hate washing dishes and dirtying everything in the kitchen.
 So back to stirring and bringing it to a rolling boil. I let it boil for at least a min or two before I turn off the burner. A rolling boil is one that doesn't stop when you start stirring it.
So after you turn the heat off add the oats, peanut butter, nuts and vanilla. Stir it all together. Drop by spoonfuls onto either waxed paper or parchment paper and let them set up. This takes awhile for them to set up. They are yummy when they are nice and warm too...apparently.

Friday, April 8, 2016

Sweet & Savory Summer Salad

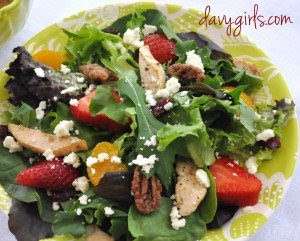
A lovely heat wave has hit the Southwest, so there was no way I was going to heat up my kitchen by cooking tonight.  With all of the delicious fresh fruits available right now, I figured this was an excellent opportunity to make a salad for dinner.  A couple of months ago, I enjoyed a strawberry and chicken salad at a favorite restaurant of mine that was so divine, I had to try and re-create it.  I cooked the chicken on the side burner of my barbeque to avoid heating up the kitchen.  The raspberry vinaigrette was a perfect pairing with the fruit in the salad, but you could use any sweet vinaigrette of your choosing. Even my fourteen year old son who barely tolerates salad enjoyed this one!
Strawberry Chicken Salad
Serves 4
2 Chicken breasts, cut into 1/2" thick strips
1 Tbsp olive oil
1 Tbsp butter
Garlic salt, to taste
Fresh ground black pepper, to taste
1/2 lb container of Field greens
1 pint strawberries, rinsed, hulled and sliced
1/4 cup dried cranberries
11 oz can mandarin oranges, drained
1/2 cup feta cheese
1/2 cup candied pecans
Melt the butter with the olive oil in a sauté pan over medium high heat. Season
chicken breast strips with garlic salt and fresh ground black pepper and place in
the pan. Sauté until chicken is lightly browned and cooked through. Remove
chicken from pan and chill. Rinse the greens and spin dry. Toss in a large bowl
with remaining ingredients. Toss in chilled chicken. Drizzle with your favorite sweet
vinaigrette and serve.
Raspberry Vinaigrette
1/2 cup Grapeseed oil, or other oil of your choice
1/2 cup Raspberry infused vinegar
1/3 cup light Agave syrup
2 tsp Dijon mustard
1/2 tsp Fresh ground black pepper
Mix all ingredients together.  Chill for an hour for the flavors to meld.

Hula Pie

 I have to admit that since I was introduced to this magnificent dessert just last month I am a little obsessed with it. It tastes so rich and nutty and is so easy to make! If you like macadamia nuts you will go crazy for this ice cream pie made famous in Hawaii. Seriously I am supposed to be dieting and I have had it three times this month.

You can make this all from scratch but it's not necessary to get a great tasting dessert that everyone will rave over.

1 Oreo cookie crust (you can make your own crust if you want with Oreos)
1.5 Quarts best quality ice cream. ( I used vanilla bean but if you can find Macadamia nut you are set!)
8 oz macadamia nuts (I liked salted)
1 bottle Mrs Richardson's Hot Fudge Sauce or any other good quality brand
Whipped Cream. (I whipped my own with lots of vanilla but cool-whip would work too)
Soften the ice cream for a few minutes while you rough chop the macadamia nuts. If you don't have an Oreo crust make one with crushed Oreo cookies and melted butter and press it into a pie pan.
Mix in about half of the nuts (you don't need to be precise) 
with the ice cream then scoop it into the crust.
Mound the ice cream up in the center so it looks nicer. I patted some chopped nuts into the top of this then froze the pie at this point in the freezer for at least 30 minutes but I would recommend an hour. This will really help to keep the pie from getting too soft when you put the chocolate layer on and the nuts on top will give the chocolate something to cling to instead of just sliding right off your pie.
After your pie has set up for at least 30+ minutes give the chocolate sauce a good stir to soften it up a bit but don't heat it. You might want to add a tablespoon of Hershey's syrup to help make it a good spreading consistency but no more than that or it will just slide right on off your pie! If you prefer you can make your own chocolate sauce but it needs to be thick so it will cling to the top of the pie. I think it looks nice to have it spread rustic style with a bit of the ice cream peaking through the edges. Makes it easier to spread too. Move quickly with this step because that ice cream melts fast especially if you live in the blazing desert like me. (it was 112 degrees today) After you get the chocolate spread the way you like add the leftover chopped nuts to the top. Rush the pie back to the freezer before you are too tempted to start eating and let it set up for at least an hour or more. I left it over night.

Each pie can be cut into 8 pieces easily because any more than that and you and your family will pass out it is so rich and yummy. I topped each piece with whipped cream but you could get by without it if you wanted. I did myself a favor and did not add up the calorie count for this. Why spoil the fun!

Fancy for the 4th

 
I spruced up my simple fruit salad for my grandkids this weekend. We had a big family barbeque for the Fourth of July with lots of family. I love fruit salad with bbq because it is so refreshing but I thought the little boys would appreciate a little something fun just for them. The oldest is only 5 and he loves when I make them something special because he says Grammy's food is made with love. How could I resist that!It was pretty simple to do. I used my little star cookie cutter for the watermelon. Just make sure when you do this to cut the watermelon in thin strips or the cookie cutter will never get through it! 1/2 inch seems just right for my cutter. Just add blueberries and there you go...July 4th Fruit Salad made with Love.

Perfect Summer Picnic Fare

Breaded chicken strips have always been some of my family's favorite picnic fare.  When my daughter, and then my husband, needed to go gluten free, we tried several of the gf chicken nuggets on the market, but were very unhappy with them.   I had a recipe from the Sunset Italian cookbook that we all loved, so I decided to find a way to modify that recipe.  Turns out it was very simple to do, and the chicken was so delicious that I didn't even miss the bread crumbs.  In fact, I like this better than the original!
I needed something special to go with the chicken, and I have been craving some good potato salad like my mother used to make for a couple of years now. I haven't made any because only my husband and I like potato salad.  This weekend I indulged myself and made some just for the two of us.  My husband kept commenting on how much he liked it all through the meal, and said I could make this any time I wanted.  He even remarked on it again at breakfast the next day!  My son even said that he didn't mind it.  I think I see more potato salad in my future.  My mother used to decorate the salad with a ring of sliced radishes around the edge of the bowl.  I didn't have any radishes so I couldn't do that but the salad was still absolutely delicious even without them.  To make the preparation easier, scrub the potatoes, boil them with the skins on, cool in ice water and then peel.  The skins slip right off!


Breaded Chicken Strips

4 Chicken breasts, cut into 1/2" strips
1 cup GF all purpose flour (I used Trader Joe's Gluten Free All Purpose Flour)
1 Egg, beaten with 1 Tbsp water
1 cup Grated Parmesan cheese
2 tsp Italian seasoning
2 Tbsp Butter
2 Tbsp Olive oil
Melt the butter with the olive oil in a large skillet over medium high heat.  Place the flour in a pie pan.  Place the Parmesan cheese and the Italian herbs in a second pie pan and stir to combine. Lightly dust the chicken strips with the flour.  Dip the dusted chicken into the egg mixture and then roll it in the Parmesan cheese mixture.  Place the chicken in the skillet and cook until golden brown on one side, about 2 minutes.  Turn the chicken over and continue cooking until the other side is golden and the chicken is cooked through, about 2 minutes more.  Remove chicken from pan and place on paper towels to cool.  Be careful not to overcook the chicken or it will be dry and tough.  This will take several batches in the skillet and you may need to wipe out the pan and replenish it with new oil and butter half way through the cooking.  Refrigerate and serve cold, or may serve warm.  These pack up perfectly for a picnic.  Serves 4.

Potato Salad

5 Medium russet potatoes, boiled peeled and diced into 1/2" cubes
2 Hard boiled eggs, chopped
2 Tbsp minced yellow onion
1/4 cup Chopped celery
1 cup Miracle Whip (NOT mayonnaise)
1/2 cup Milk
1/4 tsp Ground celery seed
1/4 tsp Dill weed
1/4 tsp Paprika, plus more for garnish
1/2 tsp Kosher salt
1/4 tsp Fresh ground black pepper
Place the diced potatoes, eggs, onion and celery in a medium sized bowl.  Mix all remaining ingredients together in a large cup until smooth, and pour over the potato mixture.  Gently mix together and chill for at least an hour.  Sprinkle lightly with paprika and serve.  Serves 4.

July 4th Trifle

TrifleFor Christmas this past year I purchased two trifle dishes.  We were having a themed Christmas Dinner, which is a new tradition we are starting.  We chose English Christmas as I found prime rib at an awesome price. To go with the theme I made trifles for dessert.  I will have to post more on the Christmas dinner another time.  So, now that I have trifle dishes I love to make them.
I find that you can make any kind of trifle, you just need a basic formula:
Here is my basic trifle formula
some sort of cake: I have used spice cake, white, pound and angel.  They are all yummy
some sort of pudding
a yummy add in like chocolate chunks or fruit
optional items: gelatin, whipped creme, dolce de leche,
Just have fun and layer, layer layer
Here are the details for our Fourth of July trifle.
IMG_0641A-281x300
Ingredients
1 loaf pound cake
1 loaf angel food cake
3 oz blue raspberry gelatin
3oz strawberry gelatin
lg. vanilla pudding
fresh strawberries
fresh blueberries
Instructions
Made up both packages of gelatin separately . I used the quick set method.  I dissolved the gelatin in one cup of boiling water then added 6 ice cubes.  Stirred until ice cubes were dissolved.  The instructions said to wait 15 minutes for a soft set.  I then made up a small package of pudding. I think it needed more pudding and so I put the larger size in the ingredient list.  Then I cut up the cake into pieces.  I made sure each piece had some white showing.  Then I emptied the dishwasher and loaded it again.  Perfect timing, the gelatin was at soft set stage.  You can omit this step and just time the gelatin but really who doesn't need to get some dishes done?
Now, take the cake and layer it in the bottom of your trifle dish.  Make sure to put the white side out so it would show through the glass.  I used pound cake on the bottom.Next put a layer of strawberry gelatin.  Then a layer of fresh strawberries.  Pour half of the pudding on for the next layer.  Put another layer of cake with cut sides out.  I used angel food this time.  Then a layer of blue gelatin topped with blueberries. Followed with some more cake and the remainder of the pudding.  For the top I arranged blueberries and strawberries. Next time I will put the strawberries on the edge with the blueberries all in the middle.
This was as yummy as it looked and was pretty simple too!

Spaghetti & Meatballs

I can never watch the Disney movie  Lady and the Tramp without wanting to eat spaghetti and meatballs.  When my son was 5, there was one evening when just the two of us were home, so together we made homemade spaghetti and meatballs and watched this movie.  He still talks about that night.
I used a recipe from a Cook's cookbook for meatballs and they were so flavorful and tender I felt like I was eating a gourmet pasta dish.  I have tried to make them several times since, using the same recipe, and they have never turned out that good again.  So I gave up on the recipe and started experimenting on my own.  What I have ended up with is a consistently flavor packed, tender, gluten free meatball that our whole family loves.  It does take a little time, so I never make this when I'm in a hurry but what a treat!  These meatballs could be used in any dish that calls for meatballs, not just spaghetti sauce.  This is a great recipe for getting the kids involved too.  Getting your hands in the meat and rolling up the balls can be great fun for them.
I used 2 slices of Rudi's Multi-Grain gluten free bread to make the bread crumbs.  I keep it in the freezer so I toasted it a bit first to soften the slices.  Any type of bread will do for this recipe, so it doesn't have to be gluten free.  The bread crumbs are what keep the meatballs from being dense hard meat pellets.  Too much and they are mushy, not enough and the meatballs are so dense they are really hard to eat.
MeatballsMeatballs
1 lb ground beef
1 cup fresh bread crumbs (not dried)
1 beaten egg
1/3 cup grated parmesan cheese
1 Tbsp onion powder
1 tsp garlic powder
1 Tbsp Italian seasoning
1 tsp Kosher salt
Mix all ingredients together thoroughly.  Form into balls of whatever size you want.  Heat 1 Tbsp olive oil in a heavy frying pan over medium high heat.  Cook meatballs, turning often, until browned.  At this point you can put the pan in the oven at 350 degrees and cook the meatballs until they are completely cooked all the way through, or you can put them in your pasta sauce and simmer for half an hour until they are cooked through.  This makes about twenty 1 1/2" diameter meatballs.  I freeze half and put half in the sauce below.
 

I used to make my own spaghetti sauce from scratch in large batches and freeze it, but I have found a Tomato Basil Marinara sauce from Trader Joe's that was just as good, so now I use that.  It is so much more convenient.  As long as you add in onion, garlic, spices and meat and simmer your sauce for at least half an hour (an hour is really optimal simmering time) even a cheaper canned spaghetti sauce like Hunt's comes out tasting gourmet.  I have received many compliments on my spaghetti when I made it this way with just using Hunts.  Especially if you saute some mushrooms in a little butter and add them to the sauce just before serving.
If you are making this sauce with the meatballs, you can skip adding the extra meat and just simmer the meatballs in the sauce, but still add the onion, garlic and seasoning.  It really does make a difference.  Also, the meat flavor from the meatballs infuses the sauce as it simmers and makes the sauce taste much richer.
Spaghetti Sauce
1 Tbsp olive oil
1/3 cup diced yellow onion
3 cloves garlic, minced
2 tsp Italian seasoning
1/2 lb spicy Italian sausage, removed from casing and crumbled
1/2 lb ground beef
26 oz jar of your favorite spaghetti sauce
1/4 tsp red pepper flakes (optional)
In a large pot, over medium high heat, saute onion until softened, but not browned. Add garlic, beef and sausage.  Cook, stirring frequently, until meat is cooked through.  Add Italian seasonings and sauce.  Add the red pepper flakes if you like some kick in your sauce.  If you are using meatballs, add them at this point.  Reduce heat to low and simmer for at least 30 minutes and up to one hour.  Serve over pasta noodles of your choice.
A word (or two) about gluten free pasta
We have found that not all gf pastas are created equal.  Some are quite delicious and taste just as good as wheat pasta, while others are downright nasty!  For some reason, a good spaghetti seems to be especially hard to come by. We have found one brand, bionaturae, that is super close to being just like the real deal, but it is very expensive.  I like to boil water in a tea kettle while the pasta is cooking and I use that water to rinse away the extra starch after I drain the pasta and that makes it a lot better.  Tinkyada makes great lasagne noodles that I actually like better than wheat noodles.  They are a little bit lighter and every bit as delicious.  The other varieties of pasta Tinkyada makes are also quite good, although leftovers get tough the next day.  This seems to be true with any brand of gf pasta.  We found this out the hard way with leftover pasta salad.